Images stitching
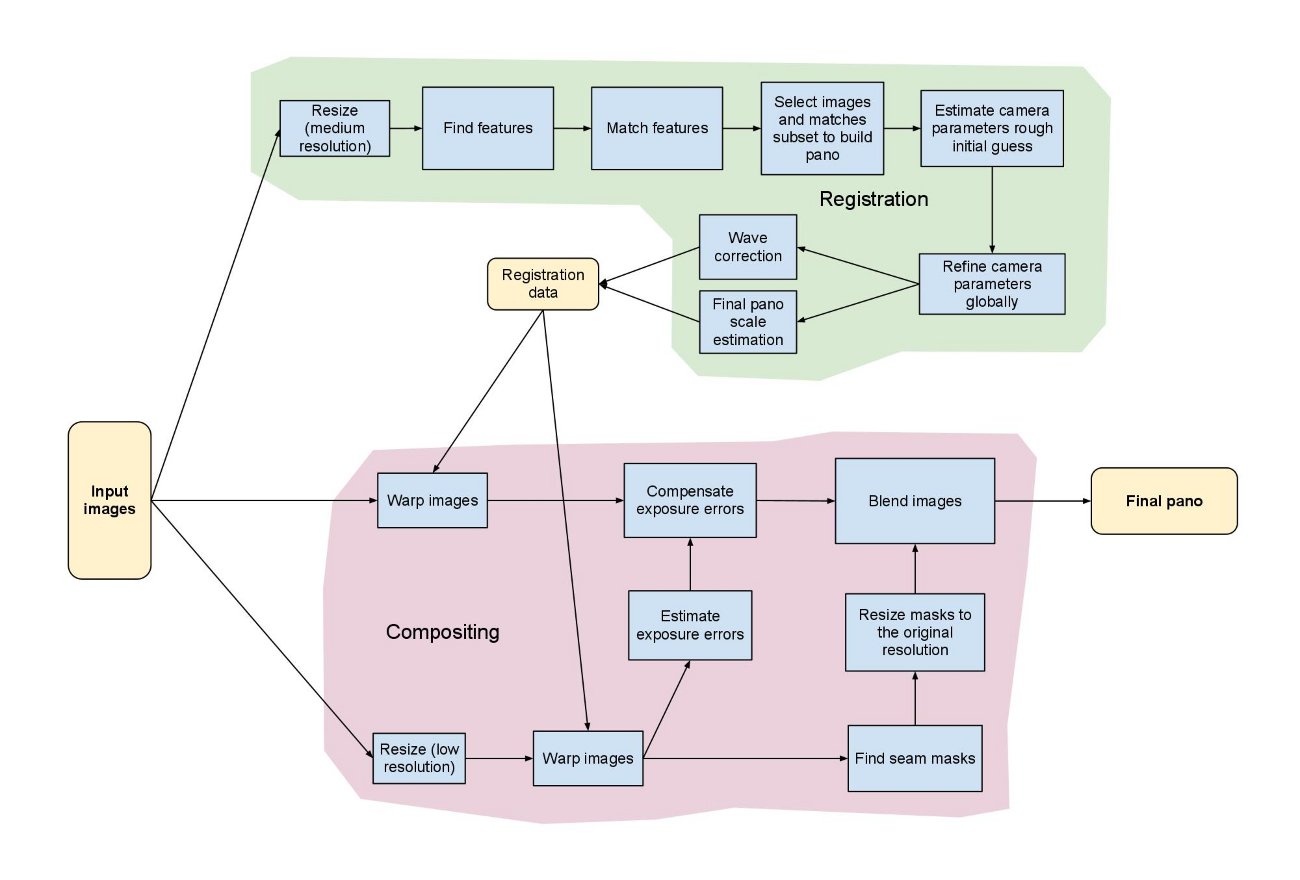
This figure illustrates the stitching module pipeline implemented in the Stitcher class. Using that class it’s possible to configure/remove some steps, i.e. adjust the stitching pipeline according to the particular needs. All building blocks from the pipeline are available in the detail namespace, one can combine and use them separately.
The implemented stitching pipeline is very similar to the one proposed in [11].
Camera models
There are currently 2 camera models implemented in stitching pipeline.
- Homography model expecting perspective transformations between images implemented in cv::detail::BestOf2NearestMatcher cv::detail::HomographyBasedEstimator cv::detail::BundleAdjusterReproj cv::detail::BundleAdjusterRay
- Affine model expecting affine transformation with 6 DOF or 4 DOF implemented in cv::detail::AffineBestOf2NearestMatcher cv::detail::AffineBasedEstimator cv::detail::BundleAdjusterAffine cv::detail::BundleAdjusterAffinePartial cv::AffineWarper
Homography model is useful for creating photo panoramas captured by camera, while affine-based model can be used to stitch scans and object captured by specialized devices. Use cv::Stitcher::create to get preconfigured pipeline for one of those models.
Certain detailed settings of cv::Stitcher might not make sense. Especially you should not mix classes implementing affine model and classes implementing Homography model, as they work with different transformations.
// structs

struct cv::detail::CameraParams;
struct cv::detail::GraphEdge;

// classes

class cv::detail::DisjointSets;
class cv::detail::Graph;
class cv::Stitcher;
class cv::detail::Timelapser;
class cv::detail::TimelapserCrop;

// global functions

Ptr<Stitcher>
cv::createStitcher(bool try_use_gpu = false);

bool
cv::detail::overlapRoi(
    Point tl1,
    Point tl2,
    Size sz1,
    Size sz2,
    Rect& roi
    );

Rect
cv::detail::resultRoi(
    const std::vector<Point>& corners,
    const std::vector<UMat>& images
    );

Rect
cv::detail::resultRoi(
    const std::vector<Point>& corners,
    const std::vector<Size>& sizes
    );

Rect
cv::detail::resultRoiIntersection(
    const std::vector<Point>& corners,
    const std::vector<Size>& sizes
    );

Point
cv::detail::resultTl(const std::vector<Point>& corners);

void
cv::detail::selectRandomSubset(
    int count,
    int size,
    std::vector<int>& subset
    );

int&
cv::detail::stitchingLogLevel();